How many cases are there in each polatt category?
Before we can transform these variables for our use, we should check the frequencies of the responses in the polatt categories. Frequency tabulations allow you to see how many individuals (or cases) fall into each category of the variables you are interested in. In addition, they also let you check for inconsistencies in the information entered into your variables. After you calculate frequencies, you could find that you have a lot of missing data or that missing data has been entered into the variable with numeric codes like “8” or “9,” which serve as place holders in variables when information doesn’t exist for certain individuals. (Please note that the missing data codes can change between surveys, although 9 or 99 are standard.) This missing data could create problems in your analyses, so it’s best to search it out before you begin running tests.
To check the frequencies of the polatt variables:
Click on Analyze, Descriptive Statistics, and Frequencies. Find polatt1-7 in the variable list on the left side of the Frequencies dialogue box. (You can easily search for variable names in dialogue boxes by right-clicking on the list of variables and selecting Display Variable Names and Sort Alphabetically. This is a trick you can use in SPSS all the time – it makes finding variables in large datasets much easier.)
Move all six polatt variables to the text box on the right side.
When all six polatt variables are in the Variable(s) text box, click OK.
Now you should see six distinct frequency tables in the SPSS Output window, one for each of the polatt variables. And each one of these frequency tables has, in addition to the 5 possible question answers, an 8 or a 9 (or both) listed as one of the values of the variable.
These are the numeric codes for missing values. We’ll need to recode these before we can create our new continuous variable, as these numeric missing values skew our data. If we include them when we calculate our new confidence variable, some people who actually did not answer the question will receive a score of 8 or 9, when they should have been removed from the analysis. Luckily, it is very easy to recode these missing values.
Click on Transform and then Recode into Same Variables.
Find polatt1-7 in the variable list on the left and move the six variables into the text box on the right. Select Old and New Values.
We want to code the values “8” and “9” in polatt1-7 as “system missing,” so that they are not used as actual data points in our analysis of our new continuous variable. So, in the Old Value text box on the upper left, enter 8, and click System Missing under the New Value header on the right. Click Add.
Repeat these steps for “9.”
Click Continue. And then click OK. Your SPSS Output should let you know that you’ve now recoded “8” and “9.”
Now that we’ve checked for (and corrected) data inconsistencies in the polatt variables, we can use them to create one new variable we’ll use as our dependent variable for this section.
First, select Transform and Recode into Same Variables.
To begin building this new variable:
Click Transform and Compute Variable.
Because we are using polatt1-7 to create a new continuous variable concerning confidence in the police, we can enter policeconf1 into the Target Variable box on the upper left. This will be the name of our new continuous variable.
Next, find polatt1-polatt7 in the variable list on the left.
Move polatt1 over to the Numeric Expression text box using the blue arrow or by double-clicking the variable name. Using the keypad in the dialogue box, enter a + sign after polatt1. Then, repeat these steps until all of the polatt variables are in the Numeric Expression box, each followed by a + symbol. (There will be no polatt4. This variable does not exist in this dataset - it could have been removed from the survey questionnaire 2011-2012.)
Click OK. The SPSS Output window should appear, telling you that you have computed polatt1+polatt2+polatt3+polatt5+polatt6+polatt7.
Now, we’ll run a frequency statistic to see if our new continuous variable has been successfully created. Go to Analyze, Descriptive Statistics, and Frequencies. In the Frequencies dialogue box that appears, scroll to the very end of the list of variables. Our new variable, policeconf1, should be at the very end of the list, because it’s the latest variable to be created.
Move policeconf1 to the Variable(s) text box. Click OK. The SPSS Output window should open, displaying a list of value frequencies for policeconf1.
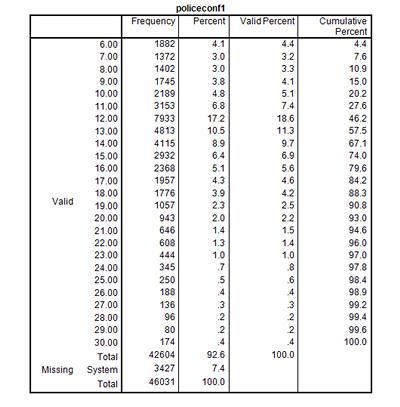
This list of value frequencies begins with 6.00, which makes sense because we have just combined six variables in which the first possible value was 1.00 (as in 1=strongly agree). This first value, 6.00, reflects all the respondents who answered “1=strongly agree” to all six polatt variables.
Our list of value frequencies ends at 30.00, because respondents had only 5 response choices (1=strongly agree to 5=strongly disagree) over only 6 questions. The highest possible combined variable value would be 5.00 multiplied by 6 possible questions.
We can take 6.00 to mean “strongly agree” and 30.00 to mean “strongly disagree.”
We can go back to Variable View, and scroll to the end of the list of variables. We should find policeconf1 at the very end, because it is the newest variable in the dataset. Now we can enter in a label for our variable by double-clicking on the Label cell and typing in something like, “I have confidence in the police,” a statement that our respondents either agree or disagree with, in varying degrees.
Summary
In this section, you have studied the variables related to your research question - confidence in the police - and investigated if any data was missing. You have also created a new variable which measures confidence in the police by combining six related variables, after first recoding the missing data so it doesn't affect your results. This new variable can be treated as continuous. Now we can explore this new confidence variable.
Note: as we are making changes to a dataset we'll continue using for the rest of this section, please make sure to save your changes before you close down SPSS. This will save you having to repeat sections you've already completed.